Ever since moving from Illinois to California, then to Nevada, I never owned my own car. I didn’t ever really need one, as in California, I just borrowed other people’s cars, and in Nevada, I lived in a place where everything was conveniently in walking distance. When I did need to go somewhere decently far away, renting a car for a day or using rideshare services was way cheaper than covering all the costs associated with actually having a car.
However, there are some changes happening to my living situation (which I will explain in further detail sometime soon) that is requiring me to get a motor vehicle. I’m obviously not going to lease a car, because most people who know how to calculate the real numbers behind leases know it’s an absolute scam, so I started doing some research on what vehicle I wanted to purchase.
I was considering getting something affordable and compact, but I’m the type of person who would buy a vehicle and stick with it for 10+ years, so I wanted to buy one that I knew I would be happy with at least 8 years from now. If I get something too economic and cheap, I was afraid I would get sick of it after a handful of years and regret underspending on my vehicle. I also didn’t want to get something too small and compact because there is a very real chance that I will literally be married and have a kid in under 8 years, and having too tiny of a vehicle would make transportation inconvenient.
I also recently became a fan of very large vehicles thanks to the local Enterprise Rent-a-Car never having sedans available when I booked them, then giving me free upgrades to pick-up trucks and SUVs. I had driven sedans my entire life (my parents had a Buick LeSabre, Infiniti I35, and Honda Accord), and at first, because of the comparatively larger size of pick-up trucks and SUVs relative to sedans, I thought I would never be able to effectively maneuver anything other than a sedan.
But, after Enterprise repeatedly kept giving me pick-up trucks and I started getting used to them, I realized that there was a whole different world of vehicles that I was missing out on. I got used to the high ride height and ground clearance of pick-up trucks, and it boosted me up into the air enough that I could see over anything. The maneuverability was still a small problem, but I eventually got used to it, and the back-up camera was helpful as well.
Because of my positive experiences with these huge vehicles, I decided that I wanted to get a mid-size pick-up truck. I didn’t want an SUV because it had worse fuel economy due to the extra metal in the rear of the vehicle, and it had less versatility in terms of cargo. I didn’t want a full-size pick-up truck because most of them just come with higher towing and hauling capabilities and a higher price tag, and I would never even come close to towing or hauling anything near the maximum capacity of a mid-size pick-up truck, let alone a full-size one.
Within the mid-size pick-up truck category, I immediately eliminated the Honda Ridgeline because the exterior styling looked too close to an oversized sedan with a truck bed. I also immediately eliminated the Nissan Frontier because it severely lags behind the rest of the segment, and it has the worst safety scores. I ended up eliminating the Chevrolet Colorado because it’s the twin of the GMC Canyon, and if I was going to opt for that model, I might as well get the more upscale version of the truck.
Between the Toyota Tacoma and GMC Canyon, I opted to go with the GMC Canyon mainly because of aesthetics and interior functionality reasons. Everything both inside and outside the GMC Canyon appeared to be much more polished, and the Toyota Tacoma had less of an aggressive exterior appearance in terms of styling. One thing that I did think hard about was the historical reliability of the Toyota brand, but within Toyota, the Tacoma is usually considered the least reliable vehicle anyway, and I haven’t really heard of American trucks being that bad, so I decided to go for the GMC Canyon.
I resisted going straight for the maximum Denali trim, and instead opted for the lower trim and decided to “build my own Denali.” A lot of the features of the Denali were things I did not really need, or were standard add-ons that I could just install myself on a lower-trim model for less than half the price. With availability, price negotiations, and all other things considered, I came to the decision of purchasing a truck at the SLE trim level.
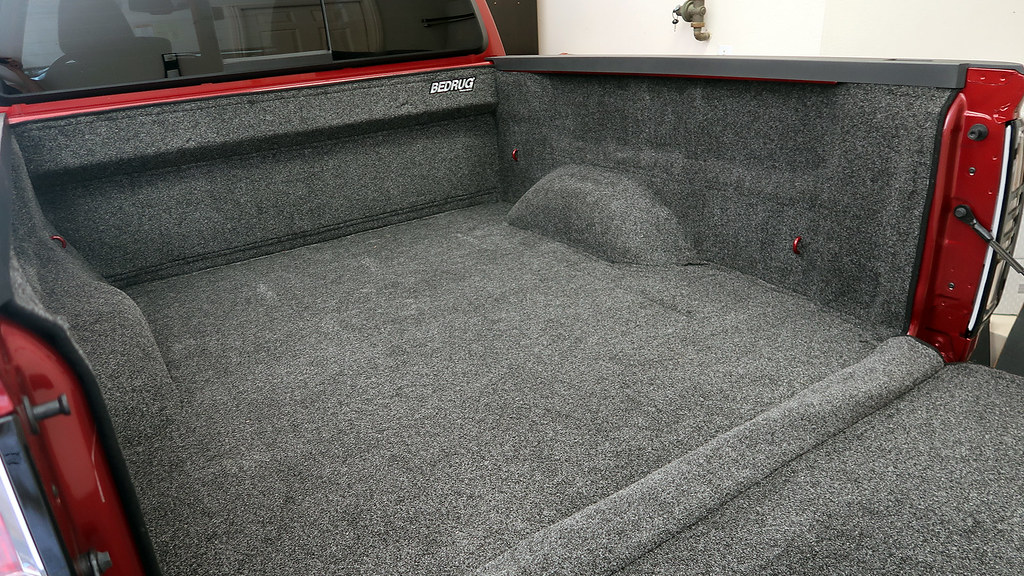
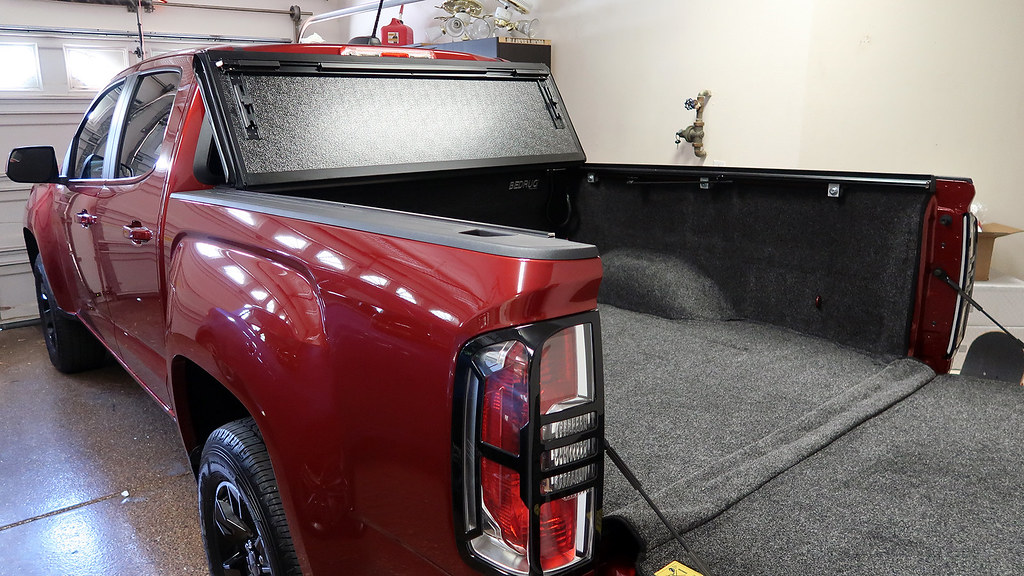
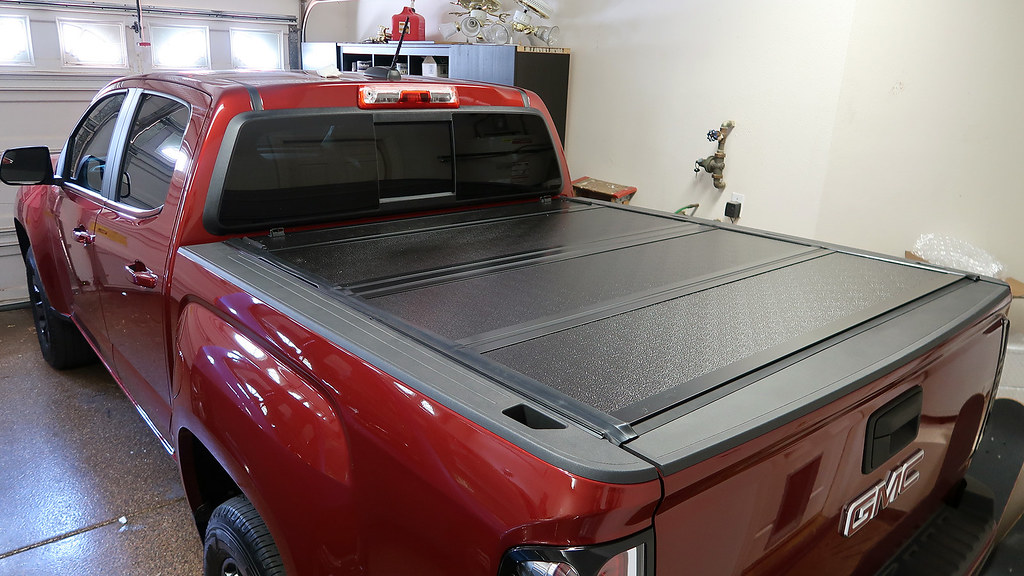
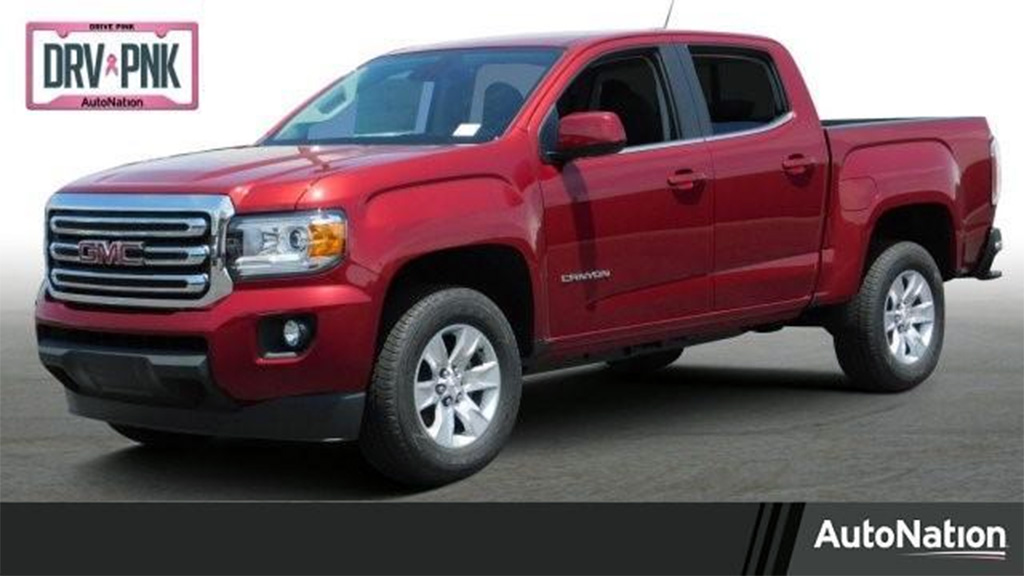
The stock image above provided by the dealership is what my truck looks like right now, though I have a long list of modifications that I want to make to the truck. Some of the items that I can install myself, I plan on purchasing the parts off Amazon and working in my garage, but for everything else, I’m looking to set up an appointment with an auto customization shop within the next week or so to get that all done.

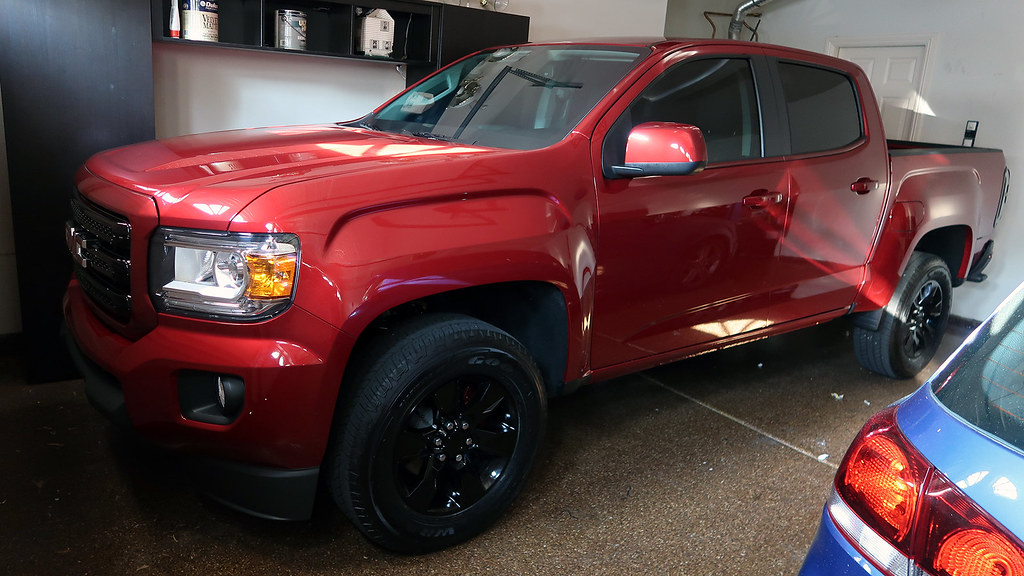
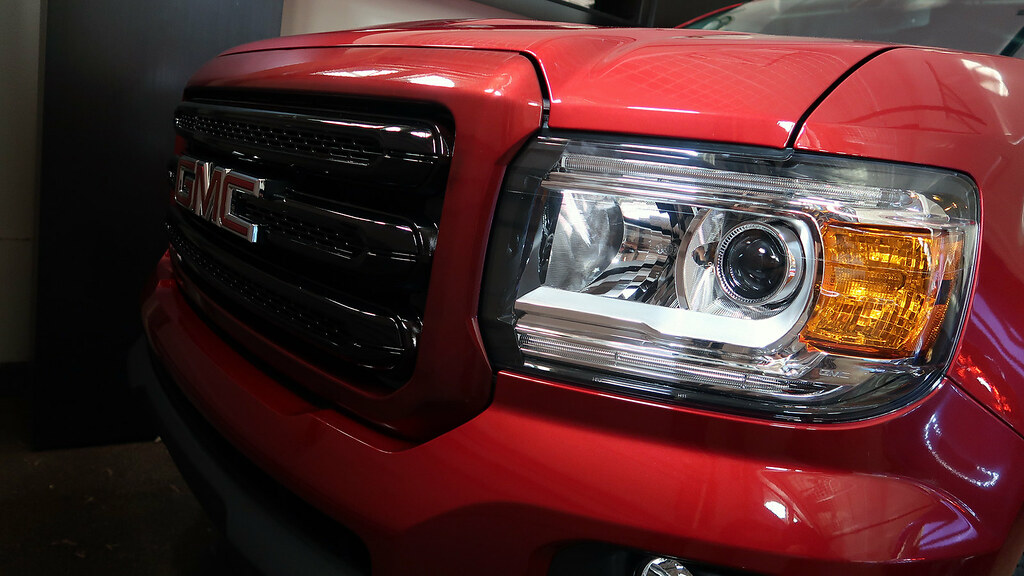
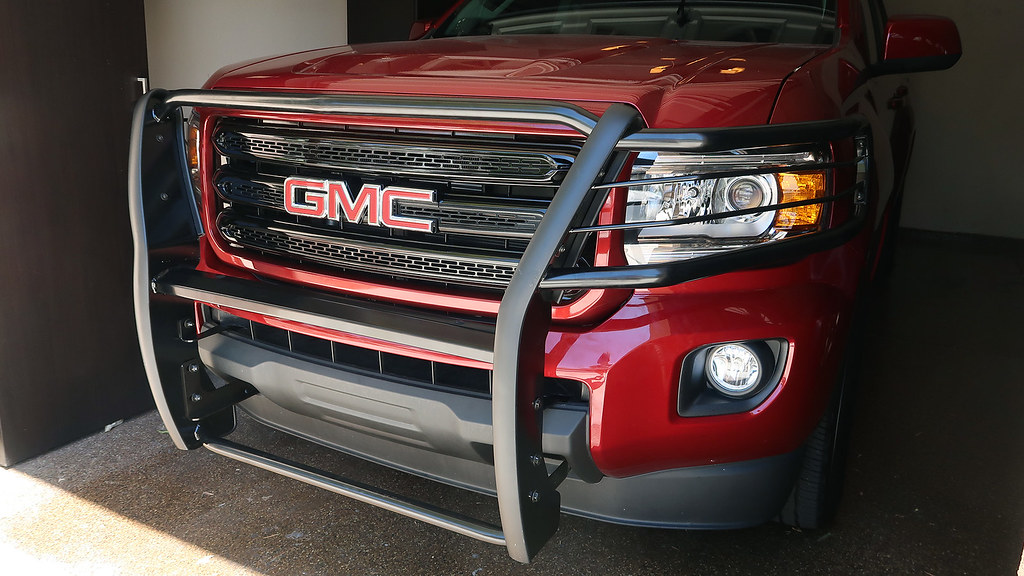 From those angles, it’s a little bit difficult to tell that this grille guard was the “wrong part” for the GMC Canyon, apart from the fact that the upper vertical half of the grille guard slants outwards (though that could potentially just be interpreted as an intentional design choice). However, when looking directly from the side, the misalignment with the headlights is substantially more obvious:
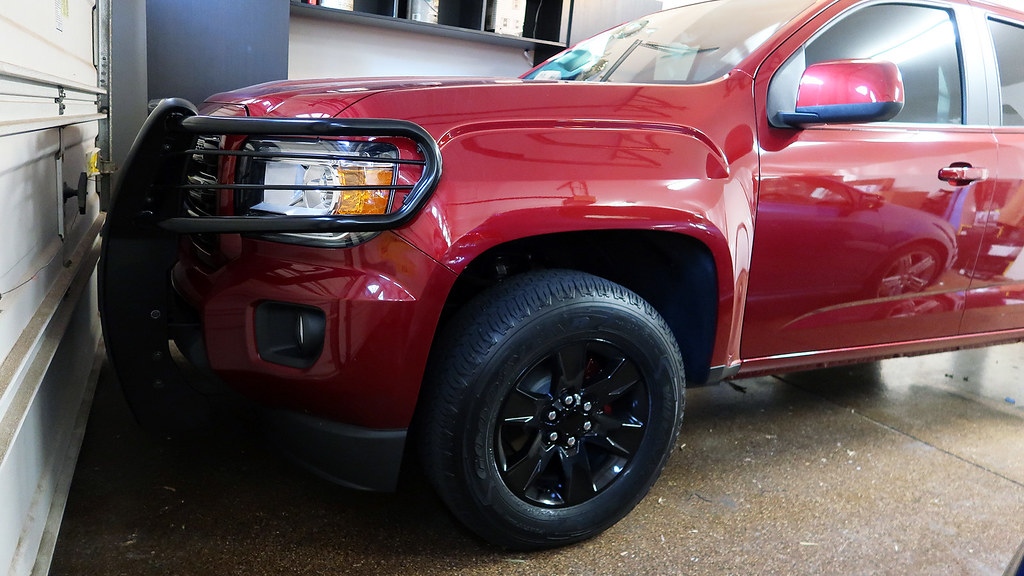 This discrepancy happens because the Dee Zee DZ502775 grille guard I purchased, even though it’s marked as compatible with both the Chevrolet Colorado and GMC Canyon, is actually only molded to fit the Chevrolet Colorado. If you’re familiar with the Chevy version of the truck, you know that the sides of the front grille slant outwards, and the headlights are narrow and taper off towards the end.
I’m not too disappointed about this because the grille guard still serves its purpose, even though it’s not a perfectly-styled fit. It’s still going to protect the front of my vehicle from low-speed hits by transferring the force of the impact to the frame of the vehicle, and it’s still going to prevent the front crumple zone of my vehicle from taking any damage in a situation where I may need to push something out of the way.
But, if you’re familiar with how detail-oriented I am, you may be wondering how I let this “mistake” slip through. The answer here is… that I didn’t.
The reason I went with this grille guard originally designed for the Chevrolet Colorado is because there actually weren’t really any other options of the “brush guard” variant available for the GMC Canyon. There were other listings that claimed that the grille guard was intended for the GMC Canyon, but when looking at the specific part number, it was clear that the angled design was so it would fit the Chevy counterpart, and it was just cross-listed with the GMC Canyon by default. All other grille guards that were available were either steel front bumpers or bull bars, neither of which I was interested in getting.
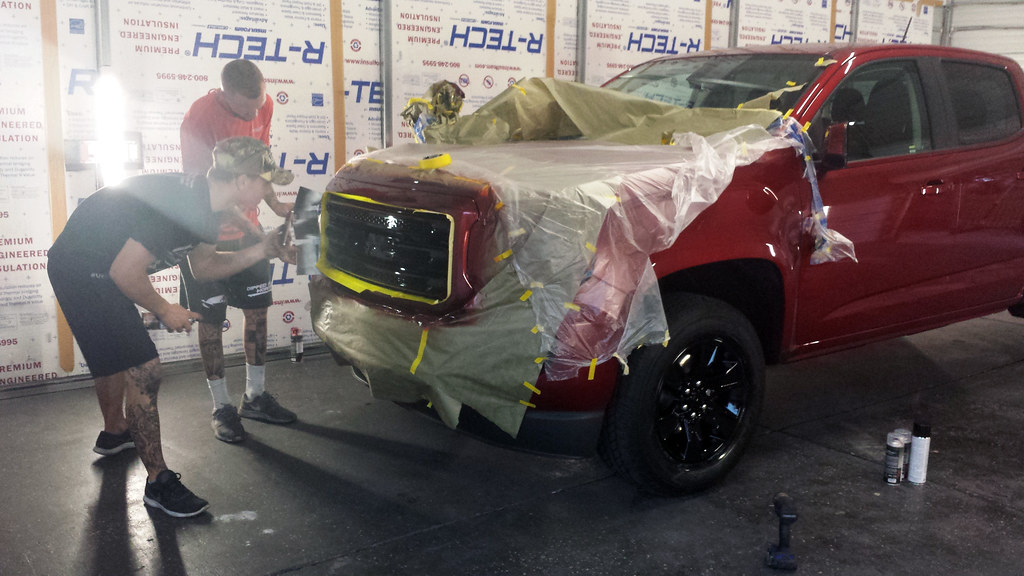
As a small word of warning, the guy who installed my grille guard on for me let me know that he had to do a bit of extra cutting beyond what appeared to be needed for a “normal” installation, and he had to dig through his screw and bolt collection to find some that ended up fitting better with the GMC Canyon, but as you can see from the photos above, he was ultimately able to figure it out and attach it securely to the frame of my truck.
This discrepancy happens because the Dee Zee DZ502775 grille guard I purchased, even though it’s marked as compatible with both the Chevrolet Colorado and GMC Canyon, is actually only molded to fit the Chevrolet Colorado. If you’re familiar with the Chevy version of the truck, you know that the sides of the front grille slant outwards, and the headlights are narrow and taper off towards the end.
I’m not too disappointed about this because the grille guard still serves its purpose, even though it’s not a perfectly-styled fit. It’s still going to protect the front of my vehicle from low-speed hits by transferring the force of the impact to the frame of the vehicle, and it’s still going to prevent the front crumple zone of my vehicle from taking any damage in a situation where I may need to push something out of the way.
But, if you’re familiar with how detail-oriented I am, you may be wondering how I let this “mistake” slip through. The answer here is… that I didn’t.
The reason I went with this grille guard originally designed for the Chevrolet Colorado is because there actually weren’t really any other options of the “brush guard” variant available for the GMC Canyon. There were other listings that claimed that the grille guard was intended for the GMC Canyon, but when looking at the specific part number, it was clear that the angled design was so it would fit the Chevy counterpart, and it was just cross-listed with the GMC Canyon by default. All other grille guards that were available were either steel front bumpers or bull bars, neither of which I was interested in getting.
As a small word of warning, the guy who installed my grille guard on for me let me know that he had to do a bit of extra cutting beyond what appeared to be needed for a “normal” installation, and he had to dig through his screw and bolt collection to find some that ended up fitting better with the GMC Canyon, but as you can see from the photos above, he was ultimately able to figure it out and attach it securely to the frame of my truck.